Keeping It Portable in 2026: Choosing A Compact Braille Display for iPhone
For braille users seeking portable solutions, the iPhone with a braille display remains the preferred combination. This comprehensive guide examines compact braille displays with 20 cells or less, from iOS connectivity and unique features to battery life and pricing, discover which portable braille display best fits your needs in 2026.
By Scott Davert
January 9, 2026
Introduction
Throughout my professional and casual interactions with braille users, it seems the most common choice of a portable solution is the iPhone with a braille display. What limited data is available seems to agree. WebAIM is a nonprofit organization that provides research, training, and tools to improve web accessibility for people with disabilities. In 2024, WebAim conducted a survey of screen reader users which indicating that, out of 1379 responses, 70.6% reported using VoiceOver when asked what screen readers they use on mobile phones/tablets. TalkBack, the built-in screen reader for Android, was reported by 34.7% of screen reader users. Since a braille display must be connected to a screen reader to function, it is a reasonable assumption based on the experience of trainers and this data that iOS and braille displays are the preferred combination by most braille users for portable use.
The iPhone and braille display combination is an instance where mainstream and assistive technology combine to level the playing field for the braille user. The wide range of braille display options on the market means there are many things to consider when making a selection, including: price, number of cells, number and function of buttons, keyboard type, battery life and many more. While the options vary widely, Apple has taken the time to develop a robust series of keyboard commands that are supported across all braille devices. For further general information on getting starting using braille displays on iOS, and introductory guide has been produced.
This article series will focus on portable devices using iOS, braille displays of 20 cells or less will be discussed. Notetakers are not included, as they are full-featured, standalone systems whose primary focus is internal computing rather than acting as dedicated braille displays for external devices. Coverage of features not impacted by iOS use are beyond the scope of this series, and devices listed are what is available on the U.S. market.
In this first article, we will look at the Brailliant BI 20X from Humanware and the Focus 14 from Vispero. The next article in the series will examine the Orbit Reader 20+ from Orbit Research and the B.Note 20 from Eurobraille. In the 3rd article, the Actilino from HelpTech and Orbit Reader Q20 from Orbit Research will be covered.
Brailliant BI 20X
The Brailliant BI 20X is a twenty cell braille display featuring a Perkins-style Keyboard, 16 gigabytes of internal memory, and the ability to connect to external media through the USB-A port and SD card reader. It measures 7.2 inches long by 3.3 inches wide by 0.8 inches thick and weighs 0.88 pounds. Positioning the device so the spacebars are closest to you, the lay-out is as follows. On the front edge from left to right are five buttons. First is the Previous Thumb Key followed by the Left Thumb Key, which is about twice as long as the Previous Thumb Key. In the middle is a circular shaped button known as the Home Key. This Key is always used to return you to the previous menu. To the right of the Home Key is the Right Key, followed by the Next Key. The Right Thumb Key is larger than the Next Key. The two larger thumb Keys on the front of the device are what pans the display back and forth. The Previous and Next Thumb Keys are used to navigate to the previous and next element on iOS. On the left side you will find three items.
Moving from front to back, you will encounter a USB-A port used for inserting a thumb drive. Behind this is the Power button. Pressing and holding it for several seconds will toggle the power, and a quick press when the device is on will either wake it up or put it to sleep. Behind this is a USBC port for charging or connecting it to an external device. On the right side are two volume buttons and a 3.5MM headphone jack. On the top surface, the Keys located closest to you are two spacebars. Behind these, you will find the 20 braille cells with a corresponding Cursor Routing Key behind each cell. Behind the Cursor Routing Keys, is a standard eight-dot Perkins-style braille keyboard. Finally, on the very back of the surface, in the middle of the device, is a speaker. Along the back side of the Brailliant BI 20X, you will find an SD card reader. The under-side of the display has a braille serial number and a couple of rubber feet to hold it in place.
Connecting to iOS
There are 2 different ways a user can connect the Brailliant BI 20X to iOS devices through Bluetooth. Both involve activating the Terminal option on the Brailliant and then choosing to add a Bluetooth device. In most cases, the user can then switch to their iOS device and go to Settings>Bluetooth and select the Brailliant from the list of Bluetooth options. In some cases, particularly on those devices running older versions of iOS, I have found that it is more reliable to go through Settings>Accessibility>VoiceOver>Braille to work when using the standard Bluetooth menu on your iOS device does not find the Brailliant.
Connecting through USB is also an option if you have an iPhone 15 series or later. From within the Terminal application, select USB by pressing dot 8 or a cursor routing button. On the iPhone running VoiceOver, connect one end of a USB-C cable to the Brailliant and the other to your iPhone. The first time you do this, you may need to allow the USB accessory to connect. Note that when connecting through USB, your Brailliant will be charged using the iPhone’s battery. At the time of writing, there isn’t a way to prevent this. As such, the user may want to monitor the battery life on their iPhone when connected over USB.
Unique features on iOS
The Brailliant has some unique features when compared with other braille displays on iOS.
One unique function is the ability to wake the iOS device from the braille display. After selecting the correct channel for the connected iOS device, the Brailliant can bring up the lock screen by pressing a cursor routing button. This is a very helpful function, especially for those who prefer to leave their iOS devices stored in a nearby bag or pocket, but isn’t available on all devices.
Bypass it
There are times when connected to external devices where the user may want some quick access to some internal information such as the battery life, time, date, etc. While connected to iOS, a user can press the command space with dots 4-5-6-8 followed by an internal command to check any of these items. The bypass command also allows one to utilize a feature called Terminal Clipboard. Terminal Clipboard allows the user to copy bits of text from the Brailliant’s internal clipboard to a connected screen reader such as VoiceOver. For example, the user may have some notes stored on the Brailliant’s internal storage which they would like to have on their iOS device. While the feature is useable, I’ve found that VoiceOver’s interpretation of the pasted text sometimes drops parts of the content, particularly with iOS 26 and later. Note that Terminal Clipboard has a character limit of 360, so it’s not possible to transfer large documents in this fashion. For more details or instructions on how to use this feature, please consult section 7.2 of the User Guide.
Other hardware options
Another thing which sets this device apart from others is Humanware’s rebranding of the Brailliant. In the United States, the American Printing House for the Blind sells the Chameleon 20, which is the same physical device at a lower price. The good news for folks in the education space is that the Chameleon 20 is Federal Quota Eligible.
There is another rebranded device which has significant software differences, but also a significant price decrease. For those in the United States, the National Library Service for the Blind offers a free eReader for patrons. In many states, this device is the same physical profile as the Brailliant and Chameleon and is called the Humanware NLS eReader. This device does not have the ability to take notes but functions in the same manor as the Brailliant and Chameleon. Though the notetaking functionality is not included with the NLS eReader, it is still possible to take notes using the connected iOS device thanks to iOS 26’s Braille Access, a set of features designed specifically for braille display users.
Miscellaneous
Battery life when used with 1 connected device over Bluetooth and WiFi disabled was roughly 12 hours based on my usage. The Brailliant can connect to up to 5 Bluetooth devices simultaneously along with one USB connection. While jumping to a specific device doesn’t have a direct keyboard command, the user can utilize the connections menu, or hold down the Home button while cycling through connections with the previous and next thumb keys when in the Terminal application.
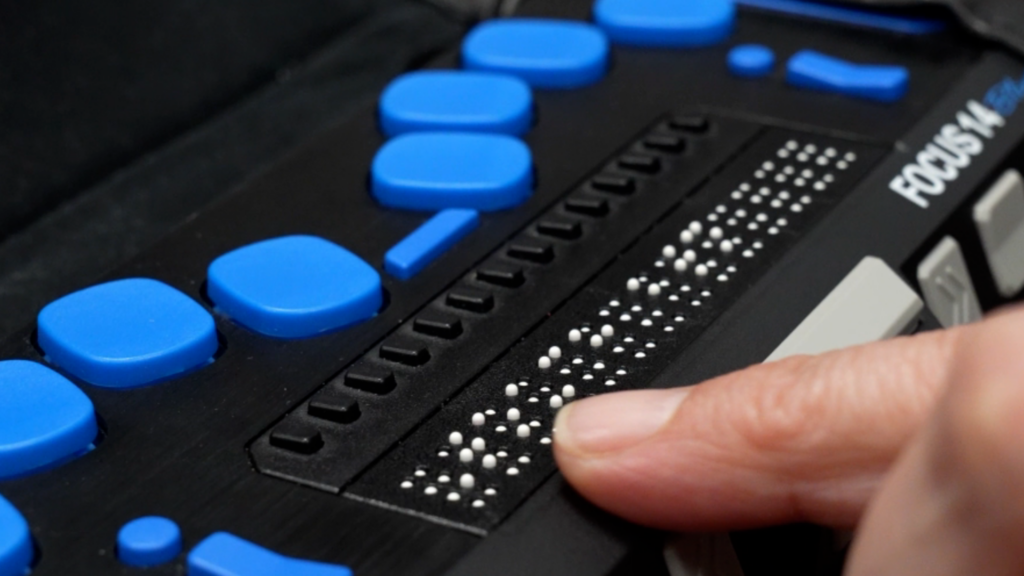
Focus 14
The Focus 14 is a 14 cell display made by Vispero. It measures approximately 7.7 inches wide by 3.0 inches deep by 0.75 inches high and weighs about10 ounces. It features a rugged exterior and a bumper on the left and right side to support absorbing being dropped. Orienting the Focus 14 so the series of buttons on the front is closest to the user, the following controls from left to right: Left Selector button, Left Rocker bar, Left Panning button, Left Shift button, Right Shift button, Right Panning button, Right Rocker bar, and Right Selector button.
Along the left side of the Focus, is the left bumper. Below that, but almost up against the bumper, there is a slot for Micro SD Cards, the Power button behind that, with the USB C port furthest away.
There isn’t anything on the right side of the Focus beyond the right bumper. On the surface of the display, the closest thing to the user is the Spacebar.
Behind the Spacebar, are 14 cells of braille, with corresponding Cursor Routing buttons for each cell behind the display. Located at the left and right ends of the display, are Left and right Nav Rocker Basr with NAV Mode buttons behind the Nav Bars. Continuing to explore the surface, the user will find an eight-dot Perkins keyboard, with a Menu button located between dots 1 and 4.
Making The Connection
The Focus 14 supports both Bluetooth and USB connects to the iPhone 15 and later. Assuming the user is running the latest software version on the Focus, when connecting through Bluetooth, an authentication code is not required. Simply turn the Focus on, and then head Settings>Accessibility>VoiceOver>braille and then choosing the appropriate device should get Bluetooth up and running.
USB support is slightly more complicated to set up, but is supported. The first thing the user must do is set the USB connection to HID. To do so, when not connected to a device, press the Menu button and then use one of the Rocker bars to navigate to USB. Press enter on this option and select HID instead of Serial. On the iPhone running VoiceOver, connect one end of a USB-C cable to the Focus and the other to your iPhone. The first time you do this, you may need to allow the USB accessory to connect. Note that when connecting through USB, your Focus will be charged using the iPhone’s battery. At the time of writing, there isn’t a way to prevent this. As such, the user may want to monitor the battery life on their iPhone when connected over USB. Note that if the user wants to use a HID connection at one point, they must change it back to Serial in order to use that type of connection.
Unique Features On iOS
As noted above, the Focus 14 has a lot of buttons on the front of the device. By default, these buttons perform VoiceOver functions which already have Perkins Style keyboard command equivalents. If the defaults are not to the users’ liking, they can customize what these buttons do. For example, I have the Left Rocker Bar set to go to the previous heading when pressed up and next heading when pressed down. The Right Rocker Bar I have set to go to the previous form field when pressed up and the next one when pressed down. To set up commands this way, go to Settings>Accessibility>VoiceOver>Braille>More Info>Braille Commands and browse the many possibilities.
Direct access
One of the things that is helpful for braille users that have more than one device connected to their braille display is the option to quickly jump to the device they wish to interact with. The Focus offers this ability. If an iPhone was connected first, it would likely be located on Bluetooth Channel 1. If the user decided to connect through Bluetooth to their PC next, that would reside on channel 2. For each available Bluetooth channel, the user can jump directly to it by holding the Menu button and then pressing dots 1-5 which will then put them in that Bluetooth channel.
Miscellaneous
Battery life on the Focus 14 seems to be between 14-16 hours when using 1 Bluetooth connection. The Focus can connect to up to 5 Bluetooth devices simultaneously along with one USB connection. A drawback not found on most braille devices is when the user has to update it. This is only an option if the user has a PC.
Product Information
Product: Brailliant BI 20X
Company: Humanware
Cost as of writing: $1,899.00
Product: Chameleon 20
Company: American Printing House
Cost as of writing: $1,715.00
Product: Focus 14 Blue 5th Generation
Company: Vispero
Cost as of writing: $1,622.25