Video Helen Keller National Center Independent Living

Independent Living Video Resources

A woman sweeping a kitchen floor with a broom

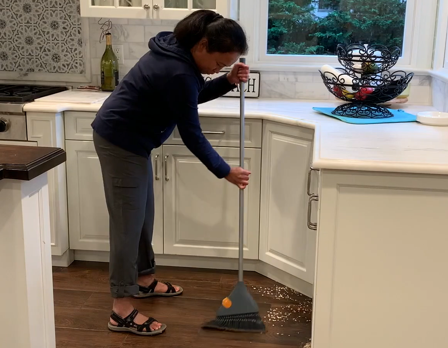
These functional video resources were created to demonstrate various tactual techniques, adaptive equipment and modifications that can be used to provide access for people who are DeafBlind and therefore increase independence in one’s home. Maricar Marquez, the supervisor of the Independent Living Department at HKNC, who is DeafBlind herself, and other DeafBlind professionals walk the learner through the steps and modifications needed to perform everyday tasks such as: making an omelet, boiling water, cleaning the home and accessing alerting systems. Stay tuned for additional resources. For specific questions regarding the techniques and/or tools used in these videos please contact Maricar at mmarquez@helenkeller.org.   

Preparing a Grilled Cheese Sandwich in the Toaster

Title Slide: Preparing a Grilled Cheese Sandwich. 

Visual Description: Here, Maricar is standing at a counter with a black tray in front of her. ON the tray is a white plate, two pieces of bread and a container of cheese. To her right is a toaster.  

Narrator: Maricar first places cheese on two slices of bread and makes a sandwich. She then tactually checks the sandwich to make sure the bread is even and then places the sandwich in a toaster bag. Maricar then finds the plug and plugs in the toaster using tactual techniques. Notice how she uses her left hand as a guide for her right as she plugs in the device. She then tactually checks that the settings on the toaster to make sure they are right. There is a nob at the bottom with a raised edge – she makes sure the raised edge is in the center which is the setting for medium toast. Maricar presses the nob on the toaster. She places her hands on the outside of the toaster – feeling it heat up. She feels the sandwich pop up when it’s done. First, she unplugs the device and puts on the oven mitt to take out the sandwich. She takes it out of the bag – it looks like a toasted Grilled Cheese sandwich – very similar to one that would be in a grill pan – but much safer. She slices the sandwich in half and shows the finished product to the camera. [End of Transcript]

Sweeping

Narrator: Here, Maricar is standing in a kitchen with a broom. There are spilt oats all over the floor. Maricar is demonstrating the grid and repetitive sweeping techniques. She sweeps from front to back and then left to right. She repeats this several times to ensure that she has gotten everything. She uses a similar technique to push the oats into the dustpan with paper towel. Maricar kneels down, holding the dust pan with her left hand and a paper towel in her right. She swipes in a grid-like fashion and pushes the oats into the dust pan. [End of Transcript]

Peanut Butter and Jelly Sandwich

Narrator: Maricar is standing in a kitchen. She has a tray in front of her. On the tray is a jar of peanut butter and a jar of jelly, a plate, a loaf of bread, a butter knife, and a spoon. To her left is a toaster. Maricar opens the bread bag and places the tie on the tray. She takes out two pieces of bread and puts them in the toaster. She then locates the tie on the tray and closes up the bread bag. Maricar tactually locates the electric socket with her left thumb and uses her right hand to insert the plug. She tactually checks the setting of the toaster and then pushes the lever down. Maricar keeps one hand on the side of the toaster and feels the vibration when the toast pops up, she first unplugs the toaster and then removes each slice with her wooden tongs. Maricar places the toast on the plate in front of her and feels the bread to make sure that they’re both in the same direction. She picks up her knife and feels the edge of the knife with her finger, and then opens up the peanut butter jar and starts to spread it on the bread. She takes a napkin and cleans her hands, and then the rim of the jar. She then opens up the jelly jar and uses the spoon to take out the jelly and spread on the bread. She uses her index finger to make sure that the jelly is evenly spread on the bread. Lastly, Maricar puts the sandwich together and places her left hand over the sandwich, holding the ends while she uses her right hand to cut the sandwich in half. [End of Transcript]

Hot Shot

Narrator: Here, Maricar is using a hot shot to make a cup of tea. The hot shot, a mug, and a pitcher of water are all placed on a tray in front of her. She places her left index finger over the edge of the mug and begins to pour the water into the mug. Once the water hits her fingers, she stops pouring. She places the pitcher down and opens up the top of the hot shot and pours the water inside. She then plugs in the hot shot and presses the button on the top of the device. She places her hands on the side of the device, when she feels the vibration stop, she holds the lever down, which dispenses the hot water into her mug. [End of Transcript]

Boiling Water

Narrator: Maricar is standing in front of a stove. There’s a stainless steel pot in front of her and a tray with a wooden spoon and a bowl of dry pasta on the counter to her left. Maricar places the pot of water on the stove. She touches the sides of the burner and the pot to make sure that it’s centrally located on the burner. She then turns the stove on. Her left hand is to the side of the burner, making sure that she feels the plane turn on. After some time, Maricar puts an oven mitt on her left hand and grabs a wooden spoon with her right. She holds the side of the pot with the oven mitt and places, the wooden spoon in the boiling water. She realizes the water is boiling and goes to get the bowl of pasta. Using two oven mitts, she places the edge of the bowl on the back of the pot and tilts the bowl until the pasta pours into the pot. She then grabs her vibrating timer and clicks on the minute button 10 times, and then pushes “start,” setting the timer for 10 minutes. Maricar then puts the timer on her belt so she can feel it when it goes off. 10 minutes later, Maricar is signing, “my timer is vibrating.” She takes off the timer and turns it off. She checks the pasta with her wooden spoon, and with two oven mitts, moves the pot from the stove to a wooden cutting board, which is placed on top of the tray. She then brings the pot to the sink where she has a strainer. She pours the pasta into the strainer. [End of Transcript]

Serene Central Alert System

Interpreter: Hello, my name is Sonia Hernandez. My sign name is an S H on the chin. I work at the Helen Keller National Center, here in the headquarters in New York. I work as the assistant residence coordinator in the dormitories. I’d like to take some time and talk about the system I have here, it’s called the Serene Central Alert Notification System. It’s very cool for a variety of reasons. The first is that it has wireless alerting capabilities. It is designed for the home and has specifications for dorm living as well. The system is used by many different DeafBlind individuals and has four ways of communicating alerts. 

The first one is a powerful flashing light, the second is an auditory signal, which can be presented at a high or low frequency depending on the user’s need. Then there’s a vibration that can be felt, which can be delivered by a bed shaker or a wireless pager. And lastly, the Serene system itself has lights and words that flash across the screen. The individual can select which method or methods work for them. 

So, now I want to take some more time and talk about how to set up the system. I’ve created this training to show DeafBlind individuals, how to use this device, but if you have family, friends, or professionals that may be helping you, or other DeafBlind individuals, you can share this information with them as well. This video is captioned and a transcript is provided. It is presented in ASL and spoken in English, so it’s going to be very easy and accessible for DeafBlind individuals. I hope you enjoy. 

Now, I want to speak to you about how to set the time. First, I’m going to explain the front of the system and what it looks like. There’s the front, facing to it and what we’re going to be talking about is what’s on the sides. Which, when you’re looking at it from the front, the buttons are on the right side. I’m going to explain what it looks like. There’s a sliding mechanism at the top of the side, the right side when you’re looking at it from the front, and beneath that there are two round buttons. The sliding mechanism, if moved to the very top is on “Time.” The notch beneath that label is “Alarm One,” the notch beneath that is “Alarm Two,” and the bottom notch is “Run.” Then the first button beneath the switch is labeled “Hour,” and it says “HR” and the last button is for minutes and reads “MN.” Now, I’m going to explain the process of setting up the time. To set the time, first you’ll need to take the slider and switch it all the way to the top. The front is actually going to say “Set” as well as the top, so I’m going to show that to you now.  

Narrator: Sonya moves the vertical switch upward. She turns the device around to show the face of the clock, the wording “Set” flashes on the screen, and then goes back to the time.  

Interpreter: On the front of the Serene System, the time is now flashing, which means it’s ready to change the time. Also something to take note of, on the front, on the top right, it has the word  “AM,” which stands for morning, and there’s a light there. That’s indicating that it is morning. If there’s no light, that means it’s the PM or the afternoon. I’m going to show you exactly where that is.  

Narrator: Note: When looking at the device, the AM light is on the upper left hand corner of the screen. 

Interpreter: Now I’m going to show you how to change the hour and how to adjust that. You have the option of pushing the button as many times as you want, or you can push and hold until you get the desired time that you want. It’s your preference.  

Narrator: Sonia moves the device to show the right side of the device. She tactually locates the vertical switch and moves down to find the “Hour” button. Sonia holds down the hour button while the time, the hour changes from 3:00 PM to 1:00 PM. Then she releases.  

Interpreter: Now I set it for one o’clock in the afternoon. You notice that the AM light is gone. Now we’re going to go to the bottom button on the right side, if you’re looking at it from the front of the device, to change the minutes, just like we did with the hours. 

Narrator: Sonia holds down the lower button, the “Minute” button.  

Interpreter: Now I’m happy with the time that I’ve set, so we’re going to go back to the switch on the right side, again, if you’re looking at it from the front, slide it down to the bottom, so it says “Run” as the very last notch.  

Narrator: Sonia demonstrates pushing the vertical switch down to “Run.” 

Interpreter: Now, on the front of the Serene System, the time is no longer flashing, which means that your time is officially set. For people who are DeafBlind, but still have some residual vision, you should be able to set this on your own. However, DeafBlind individuals who are fully blind may need some assistance with changing the time. We do have other technology and other pieces of equipment that DeafBlind individuals can use independently, which will be showcased in another vlog. Stay tuned. Thank you. [End of Transcript]

Additional Resources