A Review of the Active Braille 40 2021
Read a review of the Active Braille 2021, in which Scott Davert describes the braille display and its many features.
By Scott Davert, Coordinator: Technology, Research and Innovation Center, Helen Keller National Center for DeafBlind Youths and Adults
March 2, 2023
Introduction
There are a large number of braille displays on the market which vary in functions and price points. It is my experience that consumers often choose devices based on one specific feature that they find most suitable to their situation. Positioning and type of keyboard, feel of the braille cells, positioning of scrolling keys, availability of direct download book services and/or other online capabilities, price and many other factors may go into the braille user’s choice of display. Another line of products presents itself with the unique ability to sense when the braille reader is at the end of the line of text which will then trigger the braille display to pan forward. This feature is known as Automatic Tactile Control and is available on several devices being produced by a company called HelpTech. Along with Active Tactile Control, these devices also present with some unique abilities concerning audio. This review concerns the 40-cell model known as the Active Braille 40.
What’s in the Box?
The package should contain the Active Braille already inserted into its case, a shoulder strap, a thumb drive, power brick and USB-c cable, 64 GB Micro SD card (already in the Active Braille) and a Quick Reference guide to using the thumb drive in braille. It’s always nice to find companies who include some form of getting started guide in paper braille.
Description
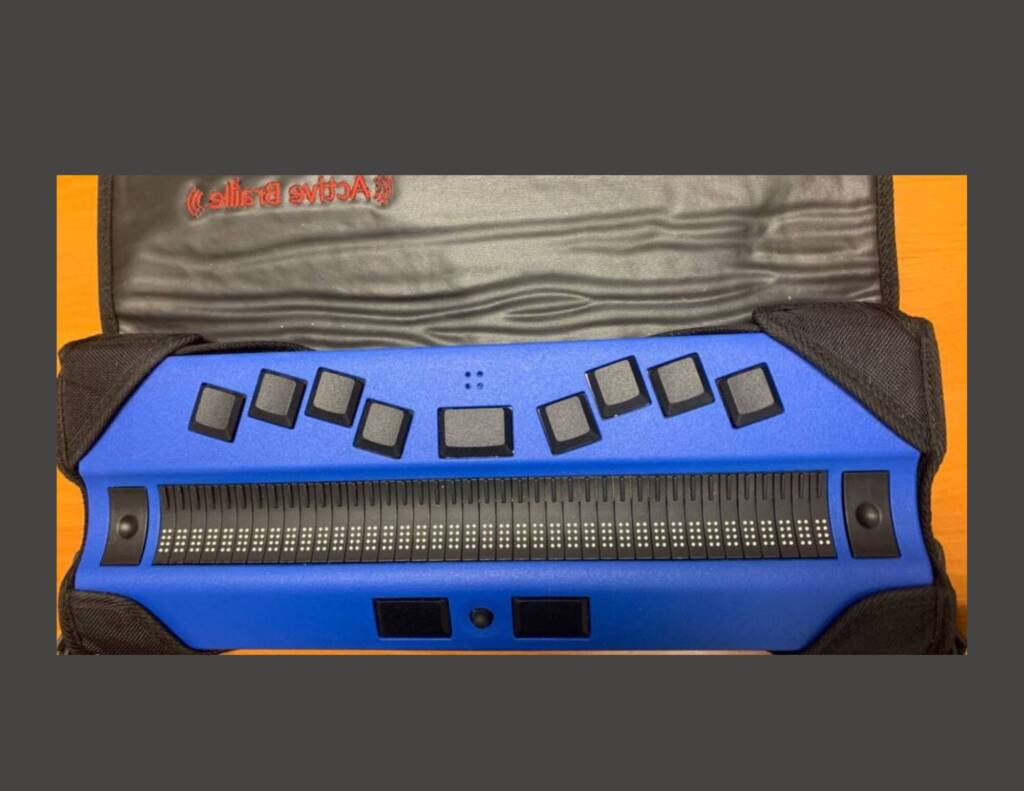
The Active Braille is a 40-cell braille display which sports 64 GB of Micro SD memory, a file manager, editor, mp3 player, clock, calculator, scheduler, games, support for braille music and a long lasting battery. The Active Braille measures approximately 12.6 inches long, 4.1 inches wide, 0.8 inches deep, and weighs 1.85 pounds. It’s shaped like a rectangle, with a tapered edge at the front. Placing the device in front of you, with its downward-sloping edge nearest you, the user will find a speaker on the front left side and a second speaker on the right front side. Starting with the keys closest to you, from left to right, you have the first of 3 rectangular-shaped spacebars, a joystick and the second spacebar. Behind this, you will find a depression that contains 40 cells of braille with triple-action keys at each end. Either of these buttons can be pressed away from you, toward you or straight down. Behind the 40 cells of braille, and level with the upper part of the triple-action keys, are 40 cursor routing buttons which are raised slightly higher than the recessed area containing the cells. Behind the cursor routing buttons, and on an elevated surface, is the Perkins-style keyboard. Between Dots 1 and 4, you will find a third spacebar with an internal microphone located behind the spacebar. On the back of the Active Braille, along the far left corner, you will find another USB-A port for connecting an external keyboard along with a slot which contains the already inserted Micro SD card. Though I consider myself to have decent tactual acuity, I was not able to find this slot easily. It would have been of help if there was some tactual way of identifying where the slot is. It is small, like a Micro SD card, so it is important to be careful when removing or inserting it into the Active Braille. On the left side of the Active Braille, from front to back are a 3.5 mm headphone jack and a USB- C port used for charging, connecting to USB equipped external devices and sending and receiving data. Along the right side, closest to you is the round Power button followed by a second Type A USB port for plugging in external keyboards. On the bottom of the Active Braille, you will find 2 sets of screws which secure the 2 replaceable batteries.
The case
The included case is made of nylon and has a magnetic closure. It would have been a nice feature if Help Tech would have added a zipper pocket to the case for storing things like the included thumb drive. That said, it is well designed and opens to provide access to all ports and controls for easy operation.
Options
The first thing I typically do when working with a braille device is configure it according to my preferences. This is achieved on the Active Braille through the Options menu. From the Main Menu, press o. The options that can be configured include: Using 6 dot braille; how the device reacts when using first letter navigation; whether to highlight hotkeys; whether to show system files; whether to show or hide folders; whether they are displayed prior to the list of files or not; quick entry; whether to show attributes; whether connecting an external keyboard will automatically switch to that keyboard; configuring automatic shut off; the mode that the Active Braille will start in; when and if to play sounds for a specific event; configuring the time format; whether to show an input indicator; the firmness of the dots; the sensitivity level of the automatic tactile control (auto scroll); when the device will go on standby; changing the language; toggling mass storage mode; controlling whether the USB-C cable plugged In will also charge the Active Braille; low energy braille; and the option to recalibrate the battery and restore settings to their factory default. For more information about any of the listed possibilities, consult the accessible PDF version of the manual for further information. The manual is also available on the included Start Stick.
Files
By default, the Files application is the first item in the Main Menu. Upon launch, there will be a few options located above the list of files and folders found on the Micro SD Card. These include the ability to create a new file, previous file and new directory (folder). The Files application allows you to perform the standard expected actions of a file management utility. It is possible to open, edit, read, rename, copy, move or delete files. There are also options to select multiple files or folders to edit at the same time. It is also possible to create folders within the folder you are currently using and to create new files. One of the other things a user may notice is the symbol 1-4-5-6 at the end of each line. This is the computer braille equivalent of a question mark. When encountering this symbol, if the user presses the Cursor Routing Button above the question mark, they will be taken to the relevant section in the manual.
Moving Data to and From the Active Braille
Though the Active braille has 3 ways of moving data, one that is not included is support for thumb drives. The user can move files to and from the Active braille by installing the HTCom software for Windows, using File Explorer/Finder or by sending data from one device to another. Transfer speeds are quite slow using either the HTCom application or File Explorer. I was seeing transfer rates of around 30 KBPS when copying files from a PC to the Active Braille. To put this in a less technical way, a typical 400 page novel in BRF file (roughly 750KB in size) takes approximately 25 seconds to transfer. I transferred an encyclopedia in BRF format to the Active Braille, and since it is over 3,200 KB, it took around 2 minutes to move. If this were a text file, it would have taken even longer to convert the file and then send it. If the user has, for example, a 2 hour long mp3 file of at least somewhat decent quality, it would be larger than 100 MB. That would take a very long time to move or copy such a file to the Active Braille.
If you feel confident in handling the Micro SD card and have a way to use it on another device, moving data directly to the card is the fastest way to accomplish file transfers. However, since locating the slot which holds the memory card may be difficult and because the Micro SD card is so easy to lose, many may not wish to do this. As the Micro SD Card contains essential system files, it should be handled with care.
The advantage to installing the HTCom software is that it has the ability to translate files from text formats to contracted braille which may be important since the Active Braille does not contain on board translation. Alternatively, one can also download a utility for Windows called Send To Braille. Mac users will need to find an application or service to accomplish this task such as Robobraille, since HTCom is only available for Windows. If you prefer software to online services, you can also convert text and other formats into braille on the Mac or Windows using an application called Braille Blaster. In both cases, be ready to provide an email address. For APH, it is required to download the program, and for Robobraille, your email address is needed to send you the converted file. In all cases, the resources listed are free.
Reading Books
Though there is not an application in the Main Menu by this name, it is possible to read content stored on the Micro SD Card. To access this, you would first navigate to the file you wish to read using the Files application and then press enter on it. From this submenu, choose the option to “view” the file. After locating the file you wish to read, pressing enter on it will load the file very quickly. The aforementioned 3,200 KB encyclopedia opened in under 2 seconds. Smaller files load nearly instantaneously. If the book is in plain text, it will also open just as rapidly but will only be readable in uncontracted braille. Since the only file formats the Active Braille can natively read are text and digital braille, this also means that there is no way to take advantage of the navigation options found in many DAISY files. The encyclopedia I mentioned is on Bookshare and I am able to get the Daisy text format of this material and load it on the Brailliant, Mantis Q40 and qBraille which all support Daisy text files. This allows for jumping through the content by headings, which can be very helpful for navigating large amounts of text, such as what a student may find with a textbook. The Active Braille does support commands to jump to the top and bottom of a file, to move by sentence, word or character among others.
The Active Braille does have the ability to create, jump to and remove bookmarks. When closing a file, the reader’s position is saved so that one can resume reading where they left off. I have found these functions to work reliably.
The Active Braille also supports the Find function when working with content. There are 2 different ways to use the Find function: through an incremental and buffered search. The incremental search will start searching as you type. The cursor stops on the first occurrence of the text and you can then either choose to jump to the next occurrence or to place the cursor so that you can begin working where the text was found. Pressing the right Triple Action key straight down moves the cursor directly to the right of the found text. Pressing the left Triple Action key straight down cancels the search.
Buffered Find is similar to what other braille devices have. Instead of searching while you type, the Active Braille waits for you to execute the search by pressing the right Triple Action button straight down. When the search string you have entered has been found, the cursor will immediately be placed to the right of that string and you can begin interacting with it as needed.
Automatic Tactile Control (ATC)
Automatic Tactile Control while reading is a pleasure. After adjusting the sensitivity in the Options menu, I found that it kept up with my reading very reliably and I was able to read naturally. When testing the ATC on an older model of HelpTech’s braille displays, I had previously found that I had to read with a much more firm touch than I was used to. I’m happy to report that this is not the case with the 2021 version of the Active Braille. For individuals with issues related to repetitive movement, this feature can be a game changer. Though many displays and screen readers support a version of auto-scroll which moves forward based on a set amount of time, ATC tracks your position and refreshes when it senses you have reached the end of the line. From an ergonomic perspective, the curved cell design allows a reader’s hands to maintain a natural curved position, rather than stretching or extending the fingers required with traditional flat cells. This natural hand position may support reduce hand fatigue when reading for long durations.
The Editor
The Editor allows you to write documents which can then be saved on the Micro SD Card. Many of the standard commands that users have become used to on a notetaker are consistent with those found on the Active Braille. Example: Space with dots 1-2-3 will take the user to the start of the file, space with 4-5-6 will move to the end of the file and space with dots 1 or space with dot 4 will move to the previous or next line respectively. I consider myself to be a rather fast typist, but was not able to outpace the Active Braille. When typing, I found the quiet and comfortable keyboard impressive. Whether you like your spacebar to be up close to the rest of the keyboard or a bit further away, the Active Braille has options for both.
Typing on an external QWERTY keyboard is an equally comfortable process, though it’s not possible to type on both the internal Perkins-Style keyboard in contracted braille while typing other parts of the same document on the QWERTY keyboard. This is because the external keyboard supports straight text typing, but with no onboard translation, it is not possible to switch input methods at will, unless the user types in 8 dot braille on the Perkins-Style keyboard.
The Editor also has the ability to manipulate larger amounts of text through the use of blocks. After selecting text, the user can copy, cut, or delete what has been selected. It is also possible to paste the selected text that has been put on the clipboard to another text field. This includes sending text to external devices connected over USB or Bluetooth.
I also enjoyed using the ATC technology when proof reading. Since Help Tech has built in a command for starting and stopping ATC, the user can quickly toggle it as needed.
Calculator
The calculator is capable of handling basic arithmetic such as addition, subtraction, multiplication division and percentages. It is also able to calculate more complex mathematical expressions that involves the rules for the Order Of Operations. The keyboard commands and the way in which results are displayed is unique compared to other devices which has this feature. Instead of pressing dot 8 to perform a calculation, the user needs to press space with 2-3-5-6. When the result is displayed, the answer is shown to the left of the equals sign and the user will still see the information to the right of the equals sign used to acquire the result. During simple calculations, this may not be necessary, but can be helpful when working with more complicated expressions. Another thing to note is that the input for the Calculator requires Nemeth Code. To use UEB math, you will need to load the proper Character Set. For instructions on how to do this, please consult section 5.1.10 of the manual. As the United States officially adopted UEB in 2016, I would have expected this to be the Character Set loaded on the Active Braille in 2021, but I was provided with the old braille code used prior to 2016. For those who are more used to the UEB code, this could also create some confusion. For example, dot 5 followed by dots 2-3-5 is how you would input a plus sign in UEB, but with Nemeth, it is 3-4-6. All numbers are dropped without the number sign. It is also possible to paste calculations in an open file when working with the Editor.
Clock
One of the most common things I utilize in a braille device is a quick way of telling the time. The Active Braille displays the time when powered on. The Clock application also features an alarm, stopwatch and timer. The manual does a good job of explaining how each of these features work. Both alarm and timer emit a sound and also display a braille alert. Since pressing any key stops the alarm when it goes off, it could be very easy to miss an alert if you cannot hear it. The Active Braille already has a built-in vibration motor, it would seem practical to have this also signal when an alarm goes off. Further, it may be preferable in some circumstances for the alarm to be discrete. In such instances, the user would likely prefer a vibration instead of a noise. As a feature improvement, it would be nice to have the ability to set recurring alarms, such as when the user prefers to wake up at a specific time each week day. This is only currently possible by using the Scheduler.
Scheduler
The Scheduler application allows the user to create, edit, delete and supports both recurring and one time appointments. It also supports performing a full text search of all appointments that have been created and the ability to customize the amount of lead time on an appointment. If a lead time is set, the user will be informed at that specified lead time of the future event. They will be notified by sound and a message on the braille display. Just as with the Clock notifications, the Scheduler notifications do not give any sort of vibratory feedback. One nice feature of the Scheduler is that it is set up to take full advantage of the 40 cells of braille. This is done through abbreviations, and the user presses the Right Triple Action key to move among the available options for scheduling an event. I found the abbreviations understandable, but the user can consult the manual which clearly defines what each one means.
Games
The Active Braille has 2 games available to play: Hangman and Braille Hunt. Hangman is the typical game which allows you to guess a secret word in so many tries. It is also possible to add your own words to the Hangman game as outlined in the manual. It is fully accessible to play using only braille. Hangman allows you to practice entering letters while also trying to solve the mystery word.
Braille Hunt is a game which requires you to identify a specific dot pattern in the second cell and then, using the ATC technology, you will hunt for the same pattern among the other possible patterns throughout the line. When you think you have identified the correct pattern, holding your finger on that pattern for roughly a second will indicate that you are choosing that pattern. Braille Hunt is a good game for exercising a hearing person’s ability to identify same patterns without having to identify them as letters. I write that it helps a hearing person because there is no indication whether the pattern you have chosen is correct or not. Since the symbols always change to a random pattern for the next round, and there is no indication on the braille display whether the guess was correct or not, a DeafBlind person cannot play Braille Hunt. Any number of ways could be chosen to provide this feedback in a format other than auditory, such as displaying the result of the guess quickly showing up on the display or having the device vibrate in a different way for a correct and incorrect answer, but none that I can find currently exists. Whether the person wins or loses, they are returned to the games menu without any indication other than the difference in chime.
Musikbraille
Active Braille, along with its smaller counterpart, the Actilino, are capable of reading braille music and also able to produce sounds based on the braille music generated on the Perkins style keyboard. Due to my lack of knowledge on this subject, along with a significant hearing impairment, I’m unable to accurately assess the performance of this function.
Mp3 player
The Active Braille also has the ability to play mp3 files. According to my testing, this is the only supported audio file type. I tried wav, m4a and FLAC files with no success. One can also play an mp3 file while working on other tasks. While in the player, it is possible to navigate the audio file using the Cursor Routing buttons, and there are also shortcuts for increasing and decreasing the volume. If you have an m3u file, and all of the mp3 files are inside the same folder, the Active Braille can also play a playlist.
Connecting to other devices for audio
Unlike other braille displays on the market, the Active braille can not only serve as a braille display, but can also act as an audio device. When pairing this way, one must initiate a different pairing to the device than as a braille display. Instructions from the manual worked as advertised, though Each time I turned the Active Braille off or went out of range of my phone, I had to re-pair the audio connection even though the phone hadn’t forgotten the Active Braille. The audio would often become choppy until I forgot the Active Braille on my phone and re-paired it. I found this to be the case under iOS 16.3.1. The advantages to pairing the Active Braille with an iPhone or Android device is that since the Active Braille has a headphone jack, this can enable the user to again have a 3.5 MM option on devices which no longer have this audio port. The lag that has traditionally been the cause of complaints from screen reader users appears to be almost entirely gone. I found that using external speakers or headphones made the audio much clearer than through the internal speakers. I found that audio is not cut off when there is a pause and audio resumes playing. For those using hearing aids where Bluetooth doesn’t always catch the first syllable or 2 when the connection picks back up, I’m happy to report that this is not an issue on the Active Braille. I also found making Face Time calls was clear and that the other person could understand me without difficulty when using the Active Braille’s microphone. It is also possible to use the Active Braille as a music player only. This is also something which sounds quite good when connected to external speakers or headphones. I found that the Bluetooth connection between various devices did not degrade when an audio connection was also established on the same device.
Connecting the Active Braille as a Braille Display
Before covering specifics, I thought it would be a good idea to discuss some settings and limitations about the Active Braille. First, PC Mode is the generic term for any type of connection with a screen reader the user will use to manage various connections. There are keyboard shortcuts for jumping from device to device unlike the Brailliant and Mantis, which can be a major productivity booster for those utilizing more than one device at a time.
When connected using PC Mode, even if you are on a Mac or other device that isn’t a PC, the spacebar located between dots 1 and 4 does not function as a spacebar, but rather, a Control key. This could be good for some, but if you wish to use the spacebar located near the rest of the keyboard as a spacebar, you are out of luck. It would be helpful if there was a setting to define the Control key on whatever you are connected to instead of only having one option.
For those connecting to an Apple device, there is a setting in the Options menu which is turned on by default called “iPhone Mode” which must be enabled for the Apple device to recognize the Active Braille as a braille display. However, if you would like to also connect to your PC or Android device via Bluetooth, you must turn “iPhone mode” off, which also deletes any already established pairings. If you are a user who wishes to connect the Active Braille to a PC and iPhone, for example, it may be best to use the PC’s USB connection instead of Bluetooth. This is the only way to utilize the 2 with the Active Braille without having to repair these devices as needed. Note that though USB support is available as of TalkBack 13.1, it does not appear that the Active Braille currently supports this. I also found during testing that I had to turn the Active Braille off and on to put it in discoverable mode. After that, by leaving the Active Braille in the Main menu, I was able to successfully confirm most pairing requests, which are required over Bluetooth. However, this initial connection should not be made while the Active Braille is in PC Mode. Though the manual documents this, it was still something I tried to do out of habit. It was also my experience that if other braille devices are paired with either Android or the iOS device that the connection was established less reliably. Automatic Tactile Control is available for connecting with external screen readers. When enabled, I found that it worked reliably and was usually good at determining when I was at the end of a line.
Connecting to iOS Devices
As mentioned above, it is necessary to enable iPhone Mode on the Active Braille before pairing it with an iOS device or Mac computer. With iOS 16.3.1, the connection was extremely solid. Interestingly, the spacebar between dots 1 and 4 did not function as a Control Key, but didn’t register at all under 2 different iOS Devices. Transferring data from the clipboard on the Active Braille to iOS was mostly reliable, though the cursor would sometimes jump around making the transfer a jumbled mess. The longer the text to be transferred, the less reliable it became. Even when typing rapidly on iOS, I found that the Active Braille was able to keep up with my typing speed. The only other challenge I had was remembering that I must add a dot 7 to the command Space with M to mute speech. This is because Space with m toggles PC Mode on the Active Braille. The manual says that you have to press and hold this command, but I found that it always moved me out of PC Mode when pressed. Unlike the various devices running the newer Humanware firmware for the NLS e-Reader, Brailliant and Chameleon, pressing dot 8 always works correctly. Commands such as select all, copy, paste and so forth also function as expected. At the moment, the Active Braille does not appear to support connecting to iOS over USB-C when using the USB 3 to Lightning Camera Adapter.
Mac OS Ventura
As long as iPhone Mode is enabled, the Mac is able to pair with the Active Braille as expected. Other than the same limitation with space and m found on other devices, I noticed no major variation between how the Active Braille and other braille devices function with VoiceOver. The good news about space with m on the Mac, which by default launches the menu bar, the keyboard command can be remapped to another combination using VoiceOver. Like with iOS, I was not able to get the spacebar between dots 1 and 4 to function as a Control key.
Connecting To Android 13 using TalkBack 13.1
TalkBack 13 introduced the ability to connect braille displays directly instead of having to install the BrailleBack app. TalkBack 13.1 introduced USB support for some braille displays, though my testing shows that the Active Braille is not one of those supported. The Focus 14 and Brailliant BI 20X were found to be compatible with this feature.
Unlike Apple operating systems and Windows, to pan forward, press the Right Triple Action key down so that both ends of the button are pressed. To pan backward, press the Left Triple Action key. Also be sure to use the Left Spacebar to insert spaces, as the right Spacebar inserts a new line. Space with m is used with TalkBack to activate the TalkBack Actions menu. Just like with iOS, pressing the keyboard combination quickly, or holding it down for a second, leaves the PC Mode. TalkBack will register the command, but the user then must go back into PC Mode to resume working with the phone. Since Android does not include the ability to customize keyboard commands on braille displays, it is not possible to re-map the command for this menu. However, this is a function users will want to take advantage of, since it allows for access in certain apps to much more quickly get to actions. Alternatively, space with 3-4-8 will allow the user to invoke the screen search function and you can try searching that way if you want, though this screen does not permit you to simply press the command, type what you are looking for and press dot 8. You have to navigate to the text field first, which does not automatically have focus. This issue is not specific to the Active Braille, but since space with m can’t be utilized, this would have made for a great workaround. The user can also simply tap the screen once with 3 fingers to launch this menu, though having to do so often can be a productivity killer if you are a user like me who prefers to keep their phone in a pocket and use the braille display.
NVDA 2022.4
HelpTech included a thumb drive with the Active Braille known as a Start Stick. The Start Stick, which is only for Windows users, contains the drivers needed to get the Active Braille communicating with the computer’s screen reader. It also contains a copy of NVDA, user documentation and the aforementioned HTCom software. Interestingly, when I plugged the Active Braille in while NVDA was running, it automatically started working. It was not necessary to install drivers or do anything beyond going into the NVDA menu and configuring preferences. While mostly reliable, I found that NVDA sometimes did not translate text with 100% accuracy. For example, sometimes when writing the word off, it will be translated as “offrom”. The Control key for the spacebar between dots 1 and 4 really comes in handy when running Windows. There are also emulation keys to perform many of the tasks a keyboard user may wish emulated on the Perkin-style keyboard. For example, when activating the spacebar between dots 1 and 4, combining this with dot 7 will emulate the Shift key and dot 8 will emulate the Alt key. It’s also possible to combine these keys to perform commands. If you want to combine the Shift and Alt keys with a letter, you could press the aforementioned spacebar in conjunction with dots 7 and 8.
I found that connecting over USB was the most reliable, but that braille would sometimes randomly decide to stop taking input from the Active Braille’s keyboard. This seemed to happen regardless of USB or Bluetooth connection, and is an issue I’ve observed with other displays, so it is not unique to the Active Braille. Like other braille devices restarting the screen reader rectifies the problem.
JAWS 2023
It is necessary to both install the driver for Windows and JAWS before one can connect to the PC reliably with JAWS. When running the Start Stick, directions will guide the user through how to install the appropriate drivers. After installation, I first tried pairing the Active Braille 2021 through Bluetooth. Though the PC recognized the Active Braille and often would accept input from the display’s keyboard, no braille would show up. After 3 re-pairings, it started working as expected. Connecting over USB was more reliable in the sense that the braille display would show braille output reliably. Since I’m typically an iOS user who doesn’t want to mess with repairing anyway, and the Active Braille is not the most portable device, leaving it connected to the PC through USB seems like the best option.
JAWS has a lot of extensive functions when working with the Active Braille. For example, though most displays support the output of status cells which convey information other than text, these displays require that the user dedicate 3 or 4 cells on the left or right side of the display. The Active Braille still allows the user to take advantage of status cells, without them getting in the way of editing or reading. Pressing the 2 bottom Spacebars together toggles you between reviewing the status cells and the active text displayed. Status cells can convey all kinds of information such as which cursor is active in JAWS, the positioning of that cursor within the window and a lot of other information. To learn more, consult the Active Braille manual linked above. For even more information, see the relevant sections of the JAWS Help resources.
There are also many keyboard shortcuts which can quickly toggle settings such as the type of input/output of braille, being able to move around the operating system and many more. Once the process is working, using the Active Braille on JAWS is a wonderful experience.
Conclusion
The Active Braille 2021 is a great choice for anyone who desires the functionality of Automatic Tactile Control. When choosing any product, it is important to prioritize your most important feature (s). While the Active Braille lacks certain features such as on board translation, direct handling of file formats other than plain text and digital braille and certain Bluetooth limitations described above, it offers Active Tactile Control which may be more important to a user who wishes to read continuously and not have to press a button each time they move forward through text. For some, this could be considered a luxury, but for certain individuals with challenges related to repetitive movement, the Active Braille may be the best choice. With some refinement of software and better implementation of features, the Active Braille can be even more appealing to a wider base of users. With a price tag of $6495, this is also a significant consideration. Though as far as I am aware, HelpTech is the only braille display manufacturer offering a 3 year warranty. It’s my hope that HelpTech will work to address some of the concerns outlined herein, and that updates will make it an even more solid product for blind and DeafBlind users.